Pages

Wednesday, April 28, 2010

Basic Photography Terms You Should Know

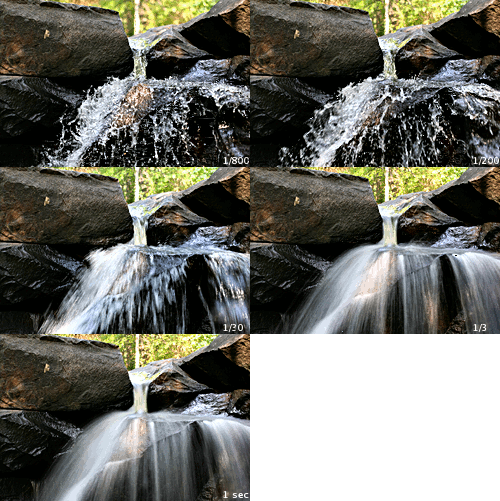
Effect of different shutter speeds on photographImage via Wikipedia
If there are 3 pillars in photography that you should know, then there are basic photography terms that you should know as well.

Here, the author cites the number as 10, so there are 10 photography terms that you should know, to help you in your SLR photography journey.

Here goes:


10 Photography Terms You Should Know

Terminology is key to any form of photography. Know your terms and what you can do with those functions or features and your photographic world opens up to you. Terms are easy to learn. What is a challenge is to make use of what these terms describe.

Getting to grips with your terminology really frees you up to grow on your photographic journey. It may not seem necessary but join a group of avid photographers and you will soon realise your lack. So let's have a look at my top 10 terms you should know.

Langford's Basic Photography, Eighth Edition: The guide for serious photographers1. Aperture

Aperture is the size of the lens opening that determines how much light reaches the digital sensor or film in an SLR camera. It is measured in f-stops ranging from f1.2 to f32.

2. Shutter speed

How fast the shutter opens. It also determines for how long the sensor or film is exposed to the light.

3. ISO

This is the sensitivity to light of a digital sensor or the film in an SLR camera. The higher the ISO, the higher digital noise in a digital image or the grain in a film image.

The Basic Book of Photography, Fifth Edition4. Exposure compensation

When a camera light meter sets the exposure on a camera, it is sometimes not 100% correct. It either overexposes or underexposures. In order to correct this there is a setting called exposure compensation which allows you to change the exposure by stops of a third to half to a full stop.

5. Depth of field

This is the depth of focus of an image. When you look at an image and see the area that is in focus in front of and behind the subject it's called the depth of field. How much of it that is in focus is called either a narrow or wide depth of field. This is controlled by the size of the aperture setting. A small aperture gives a wide depth of field while a large aperture gives a narrow depth of field.

Mastering the Basics of Photography6. F-stops

These are the individual aperture sizes that help control the depth of field and regulate the amount of light that is allowed to reach the sensor or film.

7. Fill in flash

This is a very useful way of filling areas of shadow with flash especially outdoors in the full sunshine when shadows fall across a person's face.

8. Aperture priotity

When set to this setting the camera allows you to choose the aperture while it automatically chooses the correct shutter speed.

On Assignment: Video Guide to Basic 35mm Photography [VHS]9. Shutter priority

This is opposite to the aperture priority. The camera chooses the aperture while allowing you to choose the shutter speed.

10. Rule of thirds

This is one of the basic rules of composition. Imagine a tic-tac-toe or noughts and crosses grid superimposed over the image. Where these lines intersect is where you place your focal point or subject creating a wonderfully balanced image.

Learn these ten terms and the principles, functions or  settings they represent and you will dramatically improve your photography.

JumpStart Training Guide on DVD for Basic Digital Photography (approx. 30 minutes)Do you want to learn more about photography in a digital  world? I've just completed a brand new e-course delivered by  e-mail. Download it here for free by clicking here:  http://www.21steps2perfectphotos.com/. To learn how you can  take your photography from ordinary to outstanding click  here - http://www.21steps2perfectphotos.com/21steps.htm.


Wayne Turner has been teaching photography for 25 years and  has written three books on photography.

Article Directory: EzineArticles


Taken from Ezine article directory:
10 Photography Terms You Should Know
-----

Reblog this post [with Zemanta]

Tuesday, April 27, 2010

Really Basics of DSLR Photography

Mode dial showing the following modes: auto, a...Image via Wikipedia
If you are a beginner in DSLR Photography, you'll have the dilemma of having a good piece of equipment, and not knowing how to use it. Much less, to play with it!

Not to fret; all hope is not lost.

You already have your camera. The other thing you need is a picture viewer/editor, one that has the function or capability to show the camera settings when the picture was taken. Good candidate: Picasa. Hey, this one is free; just search and download from the web.

OK, so where do we go from here?

Since we are beginners, let us crank that dial on the camera, and use and try and use and try those automatic modes. Let the camera teach you. Let the camera's computer technology guide you.

    Langford's Basic Photography, Eighth Edition: The guide for serious photographers
  1. Set the dial to each automatic mode and take pictures.
  2. Upload the pictures to your computer.
  3. View each picture, and study the values that the camera set for each auto mode.
Based on those data, you may take note of what value the setting was for:
First three are of utmost importance. if you have read a book or two, go back to the book and how it explains on the 3 settings. If you haven't read a book, now is the time to do so.

Mastering the Basics of PhotographyStudy how the 3 settings are used, and when. Basically, analog or digital, SLRs are making use of these 3 settings the most - they are the pillars of creative photography.

Having said that, here's now what I learned:

Enjoy afterward!


Reblog this post [with Zemanta]

Sunday, April 25, 2010

Canon EOS 550D DSLR Review

Canon EOS 550D (European EOS Rebel T2i) with EF-S 18-55mm IS Lens KitCanon has now released their latest DSLR camera: the EOS 550D.

Again, main selling point is its 18-megapixel sensor.

But will it sell?

For those who thinks that the higher the megapixel, the better, then the Canon EOS 550D will probably make sense.

Canon EOS Rebel T2i 18 MP CMOS APS-C Digital SLR Camera with 3.0-Inch LCD (Body Only)But at its initial release, the camera unit is quite expensive.

And besides, compared to the Nikon D40, although already considered an obsolete model, the higher sensor resolution doesn't really quite deliver a very distinctive quality!

What's more, higher megapixel could mean 1 or more of the below problems:
  • The files are twice as big
  • Shooting in RAW and JPEG will be exacting to your camera unit
  • Your SD cards will fill up faster with the bigger file size
  • Your HDD will fill up faster as well
  • Your PC will be slow when opening/editing RAW files

Canon EOS Rebel T2i / 550D 36 Piece Pro kit with Canon EF-STo think really that something can be done doesn't mean that you simply do it.

So will the 18-megapixel help sell the Canon EOS 550D camera?
Maybe. But then again, maybe not.


Have you anything to say about this?
Reblog this post [with Zemanta]

Thursday, April 22, 2010

Book to Read: Master Lighting Guide for Commercial Photographers

Master Lighting Guide for Commercial PhotographersWith time no longer on my side, I have to return this book to the library, or incur a penalty from not doing so. What else can I do, than to put it down here, so I can pick it up another day.

All I can do now is to put in here the back cover text, and what makes this book different from all the other photography books that has been written so far, printed or digital.

Here it is:


MASTER LIGHTING GUIDE for Commercial Photographers
by Robert Morrissey

MASTER THE LIGHTING TECHNIQUES YOU NEED TO PRODUCE TOP-QUALITY COMMERCIAL IMAGES

Master the skills you need to produce images what will sell your clients' products in print ads or on the Internet. Includes step-by-step techniques for photographing products, models, rooms, automobiles, and much more.

FEATURES:
  • Understanding the foundations of commercial lighting, including the types of light, the characteristics of light, and how to get a flawless exposure
  • Tips on selecting the right equipment for commercial photography -- from cameras and flash units to light stands and modifiers
  • Directions for creating simple setups to shoot products, rooms, reflective subjects, and more
  • Using panels, honeycomb grids, umbrellas, and softboxes to refine your light for precise control and flawless results
  • Special techniques for photographing corporate portraits, food, liquids, medical and scientific subjects, jewelry, glass and much more
  • Business tips for success in a competitive market


Master Lighting Guide for Portrait PhotographersWhile much has been said, I'm sure there is something to learn from this book.

Reading on the features, I am sure that I will be looking for this book, and I'll make sure that I will read it, study it, and make use of what it has to offer.

Times and seasons come and go,
they bring along the changes, too;
While what was then, is true for now,
Our now back then, ain't true somehow.

And with that I hope that I have perked up your poetic mind a bit.

C'est tout!

Reblog this post [with Zemanta]

Book review: The Digital SLR Expert Portraits

Photo by Matthew Dingemans (self). Also found ...Image via Wikipedia
If there is one book on photography that deals mainly on one topic, and focus solely on one area, this is that book.

The Digital SLR Expert Portraits
essential advice from top pros


Not authored by just one, but five, professional portrait photographers. And if that isn't saying anything yet, wait till you begin flipping the pages, and learning of their styles, hints and techniques.

Will it be possible that you become like them, and shot your portrait photos the way they do?

Yes and no. yes, in that they offer their advice (it's what the book says, advise from top pros), and that is one of the priceless gems in this book. No, in that you should be you, and you should have your own style and techniques.

Here's one from page 76, which is about low-key photos:


"
Some people feel they can't shoot low-key images because they can't black out their room enough, but this is a fallacy. You can have all the light on in the room but compared to the flash going off they will be like a glow-worm, contributing nothing to the exposure at all. Press the shutter button and a bright room will be dark and black.
"


Digital SLR Expert: Portraits - Essential Advice from Top ProsI do agree with that. I've seen another book, the review of which I didn't include in this site, which says that put up the flash power, and everything else goes darker. Of course, post-editing can help a lot afterward.

Low-key photo in a bright room? They have done it, I have done it myself, and so can you!

Having said much, know this: the camera is but a tool. If a tool is defined as 'an extension of the hands' which basically means some help or assistance, it should be noted that the tool will be used in ways and means that is mostly dependent on the user.

Thus, given the same camera unit and the same subject to shoot, 10 photographers will compose frames and shoot pictures differently, coming up with 10 different renditions of the one and the same subject.

The Digital SLR Expert Portrait PhotographyPhotography is but one of the very subjective hobby, and the photographer always applies his own artistic principles and discretion when clicking the button.

Finally, do take note that this book only mentions 1 camera brand: Canon.

If you are using the same brand, then this book is mainly for you. But if not, this book is still for you.

What's your say?
Reblog this post [with Zemanta]

Shutter Speed: Showing the Blur or Stopping the Motion

In photographs, the camera shutter speed can h...Image via Wikipedia
In my previous post I mentioned that the Aperture Setting is what we use to control and define the subject's DOF (depth-of-field), which is used mainly to make the background blur, or blur the surroundings, and keep only the main subject tack sharp.

That is most applicable when the background is distracting, and is taking away, instead of adding, to the subject being photographed.

Or, as in many wildlife photography cases, having the background surrounding just at the right degree of blurring boosts the subject matter being photographed, and brings the viewer's attention to the subject matter - and fixes it there!


Shutter speed

Understanding Shutter Speed: Creative Action and Low-Light Photography Beyond 1/125 SecondSpeeding cars, a cheetah's leap and bounds, a baby's quick moves shot continuously, and rendering the silky look of the water on a waterfall, or capturing a drop, and many others -- these are all done using the shutter speed setting.

As has been mentioned, the shutter speed setting is on an inverse relation with the aperture value: a fast shutter speed mandates an open wide aperture, and a slow shutter speed allows a small aperture opening.

A silky-smooth water on a waterfall requires about 2 seconds and above for the shutter kept open.

Creative Shutter Speed: Master the Art of Motion CaptureA drop of water, to be frozen in mid-air, requires a 'fast shutter speed', which is about 1/200 of a second, and above.

These are not empirical values, but are guides.

What can affect the settings?

The speed of the subject being photographed, or course. An F1 race definitely requires, as I've heard, something like 1/30,000 of a second shutter speed to 'catch' the speeding car still - and usually, only the car is sharp, and all others in the frame blur.

Smashbox Eye Shadow Trio for Eyes, Shutter Speed .08 oz (2.25 g)And this is a skill that you learn with each camera unit that you use. I would say this:
All cameras are made equal, but some cameras are more equal than others.

So which one is your camera-mate?
Reblog this post [with Zemanta]

Main use of Aperture Setting: Depth-of-Field Control

Jonquil_flowers_at_f5.Image via Wikipedia
What I have learned from all my book readings and my experiment with my camera is that the main use and function of the aperture is to control the depth of field of your shots.

Having said that, do note, however, that the correct exposure, or should I say, the desired exposure of your subject, is still dependent on 3 settings in your camera:
  1. aperture value
  2. shutter speed
  3. ISO
ISO can be set independently, while shutter speed is an inverse function of your aperture setting: the bigger aperture opening (smaller f value), the faster you shutter speed can be, and vice-versa.

Again, this is a beginner's knowledge, but a fundamental one, -- it is but a foundation of all the other skills that you will ever learn later on.

Leave your comments - they are most welcome.

Till then!
Reblog this post [with Zemanta]