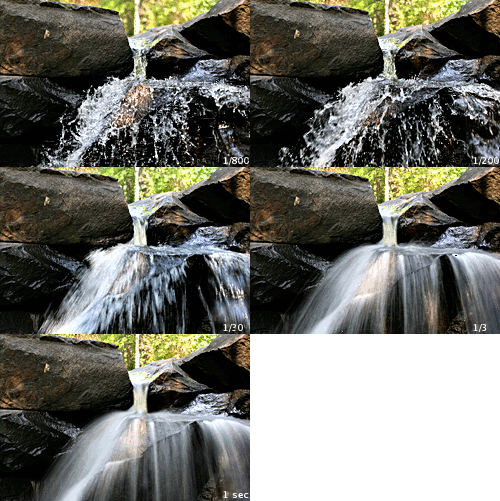
 Image via Wikipedia
Once again, that is 500 Digital SLR Hints, Tips and Techniques by Chris Weston
Read on...
----------
from page 54:
Top 10 tips for choosing lenses
- Quality - Always buy the best lenses you can afford. It's better to have less expensive camera body and a quality lens than vice versa.
- Zooms - Zoom lenses provide the greatest flexibility in composition, allowing you to alter the focal length exactly as needed. When choosing a zoom lens, try to avoid extreme zooms (e.g., those that have a very wide range, such as 7-500mm or 28-300mm), as the quality of the optics is compromised by their versatility.
- Primes - While being less versatile than zoom lenses, prime lenses (lenses of a fixed focal length) are generally of better optical quality. With extreme focal lengths, such as very wide-angle lenses and super-telephoto lenses, image quality will be noticeably better when using prime lens.
- AF lenses - Not all auto-focus (AF) lenses are as good as each other. If focusing speed is important to your photography, it's worth testing AF performance before you buy the lens.
- Inside job - Internal focusing enables lenses to be more compact and lightweight in construction than lenses where the barrel extends outward when focusing.
- Aperture - The maximum aperture of the lens will, to some extent, dictate the level of control you have over exposure settings. For example, in low-light conditions with a "slow" lens (a lens with a maximum aperture of f/5.6 or less), you may not be able to attain the shutter speed necessary to freeze motion or capture a sharp image.
- Zoom issues - With some zoom lenses the maximum aperture can vary depending on the focal length set. This system is used to reduce the size and weight of the lens but, again, can limit your options when it comes to setting exposure. If possible, always opt for a zoom lens with a fixed maximum aperture.
- Glass - Lenses that use low dispersion glass help to minimize chromatic aberration, a type of image and color dispersion that occurs when light rays of varying length pass through optical glass. In so doing, they improve sharpness and color correction.
- ALEs - Lenses with Aspherical Lens Elements produce better image quality by eliminating the problem of coma (distortion at the edge of the image) and other types of aberration, particularly prevalent in wide-angle lenses use din conjunction with large aperture.
- Stability - Increasingly, lenses are being produced with some form of optical stabilization. These lenses make hand-holding the camera at slow shutter speeds more practical, and reduce the likelihood of image blur caused by camera shake. They are widely used in sports and wildlife photography.
Metering Modes, and when to use them
- Multi-segment metering - Matrix metering by Nikon, Evaluative metering by Canon and Honeycomb by Minolta. All but referring to multi-segment metering. Takes from many areas around the frame, then average the result. Usage: General-purpose photography or difficult lighting conditions
- Center-weighted metering -usually the subject is occupying the frame large, about 75% or more. Usage: Formal portraits of people and animals; backlit subjects (except silhouettes).
- Spot metering - the camera takes in about 2-3% of the frame only; what to say, it is for precision metering! Usage: Photography of high-contrast scenes or scenes of multiple tones, like landscape photography; critical exposures; assessing the subject brightness range (SBR).
- Manual metering - as it says, this is manual metering. There's help in the camera. An analog meter display in the camera's viewfinder, with 2 arrows pointing and moving right and left. Bar stops at middle, or '0', to say that camera meter reading aligns with the exposure setting as you adjust the aperture and shutter speed. Usage: creative photography that is not governed by the auto or preset settings.
The sunny f/16 rule:
- When taking pictures in bright sunlight, the high level of contrast can sometimes confuse a camera's internal meter. To avoid inaccurate exposures in these conditions, set the lens aperture to f/16 and the shutter speed equivalent to the ISO setting. This is known as the 'sunny f/16 rule," and is remarkably accurate.
The sunny f/22 rule:
- When photographing predominantly white or very light subjects in bright sunlight, a variation of the sunny f/16 rule is the sunny f/22 rule. The process for assessing exposure is the same, except that f/22 is used as the base aperture. By stopping down by one stop, you avoid overexposing the highlights.
When photographing in moonlight:
- When using moonlight as the main light source, set a shutter speed of around 4 min when the moon is full and the sky clear. Double the amount of exposure when the moon is partial. To photograph the moon itself, use a long telephoto lens and set an exposure of around 1/1000 sec @ f/8 with an ISO of 400.
Streaked lighting:
- To create streaks of light from moving cars, set the camera on a tripod, manually focus the lens, and set an exposure of between 10 sec and 20 sec at f/22 (ISO 400). Use the Bulb (Time) setting if necessary, and activate the shutter using a cable release.
I think that that is all that I want to cover. It doesn’t mean that there are no more that can be derived from the book. On the contrary, there are a ton of useful tips and tricks from that book. What I am saying is that go and grab a copy of it, whether that means buying your own, or borrowing from the library.
Enjoy!
![Reblog this post [with Zemanta]](http://img.zemanta.com/reblog_e.png?x-id=33894353-234a-451a-bcaa-8d2b10218200)
No comments:
Post a Comment